(Updated January 12, 2026)
Table of contents
-
Overview
The Linked List
Building the LinkedList Class
Iterators
An
IterableListImplementing
remove()An Alternative Node Approach
Exercises
Overview
We discovered the usefulness of collecting data together under a single identifier name when using arrays. Further, we enjoyed the simplicity of accessing the elements of the array with the array access operator ([]) and how these objects lend themselves well to iterating over the entire array contents with a simple for loop.
These constructs were further used in the context of a Vector and ArrayList. These classes use an array to store our type-checked data and allow us to add() items, inspect a location using elementAt(), delete items with remove() and place items in the middle with insertElementAt().
Keep in mind that all of this flexibility comes at a price. The array is still always linear and complete. No empty elements are left behind from a remove() as this would cause the Vector to have to keep track of empty slots in the array, and it would be an iterative challenge to display each element value. The Vector must close the gaps on remove() and make room for insertElementAt(). This involves shifting the array elements up or down to address the request. (See Chapter 9 section on managing arrays.)
This is further complicated by the need to occasionally increase the overall size of the Vector or ArrayList by generating a new array of a larger size and copying the contents of the old array into the new array. Recall that this is necessary since you cannot extend an array once it has been instantiated.
This is not to say that Vectors or ArrayaLists are necessarily bad to use. Indeed, these constructs help solve everyday problems and perform well if not abused by making them do more work than intended. That is to say that due to the volume of data that may need to be copied as the Vector grows, these are not scalable constructs. This is, of course, because large volumes of data make them slow, not necessarily the type of data.
The gap management is the real issue with arrays. Some operations on arrays and array-like objects are O(n) (insertElementAt(), remove()) while others are O(1) (add(), elementAt()).
Ultimately, minimizing the cost of gap management could go a long way to improving the times of specific operations. One solution is a linked list.
The Linked List
The linked list works by creating a reference list. Rather than creating an array, we agree to follow some straightforward rules about the data:
- Lists are made up of nodes. Each node contains at least two portions of information: the data and a reference. Consequently, each node is an object.
- There exists a reference variable that represents the head of the list. This variable points to the first node in the list.
- Each node points to the next node, which points to the next node. This creates a chain of nodes.
Notice that these rules do not govern what the data represents or how the data may be inserted or removed from the chain. Ultimately, our goal is to allocate space as we need it rather than an “all at once” method used for arrays or a “reallocate and copy” as with Vectors and ArrayLists. Let us look at what we intend to create with Figure 1.
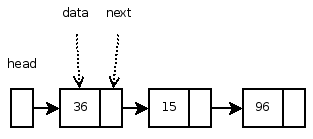
Figure 1: Example of a linked list with the head marking the start of the chain.
In Figure 1, we can see the head, which points to the first node in the chain, and from this node, we can follow all of the links. Since we are storing integers in the list, let us now take a look at what a Node class might look like with the following:
private class Node {

    private int data; // data portion of node
    private Node next; // reference to next item in the chain

    private Node(int item) {
        data = item;
        next = null;
    }
}
Recall that a class defines how an object will look and perform. This simple Node class only defines how the data will be stored. In the constructor, the next instance variable is set to null, which means that it does not point to anything. It is up to the programmer to determine what this node will point to and which node shall point to it. The data instance variable is set through the constructor. Note that the instance variables and the class are private. This was chosen since this will be an inner class of a larger class that will determine the methods of creating, accessing, and modifying a linked list using the Node class.
Let us change the node to store String class data. This would look like:
private class Node {

    private String data;
    private Node next;

    private Node(String item) {
        data = item;
        next = null;
    }
}
Since the data member is now a reference variable that points to a String object, we will need to change our visual to something like Figure 2.
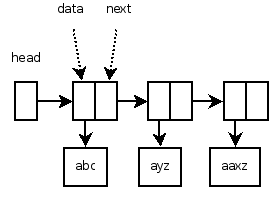
Figure 2: Node class reworked to store String data.
Note that we could build a generic Node class and not need to recreate Node with a different type. This is covered in Chapter 17 on Generic Methods and Classes. Now we will present a program to build a list, but without the methods to create and maintain the list. This is done for demonstrative purposes.
import java.util.Scanner;

public class ListOfNodes {

    private static class Node {
        private String data;
        private Node next;

        // Node constructor
        private Node(String item) {
            data = item;
            // not pointing to another node, yet
            next = null;
        }
    }

    public static Scanner kb = new Scanner(System.in);

    /**
     * Dump nodes pointed to by list
     *
     * @param list
     */
    public static void dumplist(Node list) {
        Node p;

        p = list;
        System.out.println("\nList Contents:");
        while (p != null) {
            System.out.print(p.data + " ");
            p = p.next;
        }
        System.out.println();
    }

    public static void main(String[] args) {
        Node head = null, n;
        String w;

        System.out.print("Enter a word: ");
        while (kb.hasNext()) {
            w = kb.next();

            // create new Node
            n = new Node(w);

            // assign the next field to point to
            // what head is currently pointing to
            n.next = head;
            // make the new node the head
            head = n;

            dumplist(head);
            System.out.print("\nEnter a word: ");
        }
    }
}
Example 1: Program to demonstrate how a linked list is built and displayed.
The program in Example 1 shows a main() method that uses an EOF loop to chain strings together in a list. It also provides a method dumplist() to display the contents of the list so the user can see how the chain is being built.
The dumplist() method of Example 1 receives the pointer to the head of the chain and “walks the chain” from node to node, displaying values until the null reference on the end of the chain is found. It can do this since Node is an inner class.
Below is a sample run of the code in Example 1.
Enter a word: top

List Contents:
top

Enter a word: lop

List Contents:
lop top

Enter a word: pop

List Contents:
pop lop top

Enter a word: shop

List Contents:
shop pop lop top

Enter a word: stop

List Contents:
stop shop pop lop top

Enter a word: <EOF>
The cost of adding a node to the list is O(1). Since we are placing the new node at the head of the chain each time, this is very efficient. The dumplist() method is O(n) since we must walk the chain to visit each node to print them. The space complexity is always O(n) for however many nodes we have.
Building the LinkedList Class
The LinkedList class we will define here is not the same as LinkedList, which can be found in the java.util package. Our class is much simpler and not as robust in illustrating the underlying architecture of the data structure. The remainder of this discussion has this specific goal in mind.
In this design, we will impose no additional structural or organizational rules on the list. New items will be placed on the list at the head position as in Example 1. Items to be deleted will be sought after and removed, with the gap being closed by rearranging the references. Garbage collection takes care of the deleted nodes since they no longer have an active reference.
public class LinkedList {

    private Node head;

    private class Node {
        private int data;
        private Node next;

        private Node(int item) {
            data = item;
            next = null;
        }
    }

    // start with an emply list
    public LinkedList() {
        head = null;
    }

    // display list of nodes pointed to by head.
    public void dumplist() {
        Node p = head;

        while (p != null) {
            System.out.print(p.data + " ");
            p = p.next;
        }
        System.out.println();
    }

    public void insert(int item) {
        // insert node to the head of the chain

  /*
             +-----+
     ------> |   | | <--- n
     |       +-----+
     |            |
     |            |
     |            V
     |           +-----+    +-----+
  head ---XXX--> |   | |--> |   |\|
                 +-----+    +-----+

  Head points to current chain. Create new n.
  Set n.next to point to same node as head.
  Set head to point to new node.
  */

        Node n = new Node(item);

        n.next = head;
        head = n;
    }

    public void delete(int item) {

        // remove node that contains item

    /*


                   back       cur
                    |          |
                    V          V
                   +-----+    +-----+    +-----+    +-----+
    head --------> |   | |-XX | X | |--> |   | |--> |   |\|
                   +-----+    +-----+    +-----+    +-----+
                        |                   ^
                        |                   |
                         -------------------

    Head points to current chain.
    cur and back walk the chain until we find node
      to be deleted.
    Set head or back.next to point to same node as cur.next.

    */

        Node cur = head, back = null;

        while (cur != null) {
            if (cur.data == item) {
                if (back == null)
                    head = cur.next;
                else
                    back.next = cur.next;

                break; // leave the loop
            } else {
                back = cur;
                cur = cur.next; // move to the next node
            }
        }
    }

    public static void main(String[] args) {
        LinkedList ll = new LinkedList();

        System.out.println("\nAdding 35, 78, 45 and 0 to the list");
        ll.insert(35);
        ll.insert(78);
        ll.insert(45);
        ll.insert(0);
        ll.dumplist();

        System.out.println("\nRemoving 0 from head of list");
        ll.delete(0); // beginning
        ll.dumplist();

        System.out.println("\nRemoving 78 from middle of list");
        ll.delete(78); // middle
        ll.dumplist();

        System.out.println("\nRemoving 35 from end of list");
        ll.delete(35); // end
        ll.dumplist();
    }
}
Example 2: LinkedList using an inner class Node and methods insert(), delete() and dumplist().
In Example 2, we introduce the LinkedList class. This class uses simple integers, and a dumplist() method is included in the class for easy viewing of the list contents. The head of the list is a Node reference variable and is the sole instance variable.
The LinkedList() constructor simply sets the head to null to represent an empty list. The LinkedList class is using Node as an inner class. The Node() constructor requires data to be provided for a new node to be created.
Both the insert() and delete() methods take integers as their parameters. The insert() method, as stated earlier, simply puts the new data item as the head of the chain. It does this by copying the current head reference into the next member of the new Node object. Then the new Node object reference becomes the head.
The delete() method must walk the chain in order to determine if item is present in the list. As it walks the chain with cur (current node), it keeps track of where it has been with back (previous node). This is necessary so that if we find the node to remove, we can make the back node’s next member (back.next) point around cur to the node that follows cur (cur.next). This effectively deletes the node from the list. Of course, there is one particular case where the item being removed is the head. In which case back will not have pointed to anything, which means we need to set the head to the node that follows cur (cur.next).
Example 2 contains a main() method as our LinkedList exerciser. This program inserts a few integers, dumps the list, and then removes the head, a middle item, and an item from the end. These cases must pass for this to be a good class.
Iterators
Two interfaces exist (Iterator and Iterable) to set up an Iterator object and to indicate that our class is iterable. By saying that our class is iterable, we immediately gain the ability to allow our class to partake in the beauty that is the foreach loop. Recall that the foreach loop was handy when iterating over an array or a vector to obtain all of the values, one at a time, for efficient loop processing.
The Iterable interface is defined in java.lang and is available in JDK 5 or later. The Iterator interface is defined in java.util. To use the Iterable interface, you simply indicate when you define your class that you will implement that interface. (the Iterable interface is defined in java.lang.)
public class NewClass implements Iterable<T>Where T represents the checked type (not a primitive type) the class will operate with during the foreach loop. For example, the value of T could be String or Integer. We also agree to implement a method:
public Iterator<T> iterator()which returns a checked-type Iterator object. This Iterator object is what is used by the foreach loop.
To use the Iterator interface, we first need to define an iterator class capable of using the Iterator interface. This can be another inner class. We declare our iterator class like so:
public class IteratorClassName implements Iterator<E>Where E represents the checked type of element that is returned by the next() method. What next() method do you say? Table 1 describes the methods we need to define as a result of using the Iterator interface.
Methods of the Iterator Interface |
boolean hasNext()Returns true if there are more elements in the iteration. |
E next()Returns the next element in the iteration. |
default void remove()Remove the element from the collection that was used for the most recent next() call. (This method was made default in JDK 8. It is optional and not required to fulfill the interface requirements. Using it without defining it, however, will throw an UnsupportedOperationException.) |
Table 1: Some methods of the Iterator interface.
An IterableList
Now, we modify our linked list to iterate over the data without needing to have secret knowledge of the data structure. The class in Example 4a demonstrates using the two interfaces mentioned in the previous section.
import java.util.Iterator;

public class IterableList implements Iterable<Integer> {
    private Node head;

    // This is the requirement of implementing Iterable. Provide
    // an iterator() method that returns an Iterator object.
    public Iterator<Integer> iterator() {
        return new LLIterator();
    }

    // This is what the iterator() returns to the caller.
    // This is the iterator object that processes the list.
    private class LLIterator implements Iterator<Integer> {
        private Node current = head;

        public boolean hasNext() {
            return current != null;
        }

        public Integer next() {
            int item = current.data;
            current = current.next;
            return item;
        }
    }

    private class Node {
        private int data;
        private Node next;

        private Node(int item) {
            data = item;
            next = null;
        }
    }

    public IterableList() {
        head = null;
    }

    public void insert(int item) {
        Node n = new Node(item);
        n.next = head;
        head = n;
    }

    public void delete(int item) {
        Node cur = head, back = null;

        while (cur != null) {
            if (cur.data == item) {
                if (back == null)
                    head = cur.next;
                else
                    back.next = cur.next;

                break; //leave the loop
            } else {
                back = cur;
                cur = cur.next; // move to the next node
            }
        }
    }

    @Override
    public String toString() {
        StringBuilder o = new StringBuilder("[");
        Iterator<Integer> iter = iterator();

        // first data value is alone.
        if (iter.hasNext())
            o.append(iter.next());
        // remaining data values have ", value"
        while (iter.hasNext())
            o.append(", ").append(iter.next());

        return o + "]";
    }

    public static void main(String args[]) {
        IterableList il = new IterableList();

        System.out.println("Adding values...\n" + il);
        il.insert(35);
        System.out.println(il);
        il.insert(100);
        System.out.println(il);
        il.insert(1024);
        System.out.println(il);
        il.insert(2048);
        System.out.println(il);

        System.out.println("\nUsing a for-each loop to print values...");
        for (int i : il)
            System.out.println(i);

        // Remove a middle.
        System.out.println("\nDeleting 100");
        il.delete(100);
        System.out.println(il);
        // Remove a head.
        System.out.println("\nDeleting 2048");
        il.delete(2048);
        System.out.println(il);
        // Remove the end.
        System.out.println("\nDeleting 35");
        il.delete(35);
        System.out.println(il);
    }
}
Example 3: IterableList class demonstrating the use of the Iterable and Iterator interfaces.
The dumplist() method has been removed, and the insert() and delete() methods and inner class Node are precisely as they were for the LinkedList class.
We have also added a new toString() method to make printing the list easier. It attempts to produce output similar to printing a Vector or ArrayList with comma-separated values in square brackets.
The IterableList simply implements the Iterable interface, then immediately declares the iterator() method, which returns an instance of the LLIterator class.
The LLIterator class implements the Iterator interface and declares an instance variable current to keep track of where it is in the list and the three methods that must be defined in order to user the Iterator interface.
When an LLIterator is instantiated, the default constructor (not shown) provided by Java is executed. Of course, this does not do anything, and the current instance variable is set to head. The methods hasNext() and next() work directly with the current instance variable to provide information about the state of iterating over our collection of data.
Running Example 3 produces the following output:
Adding values...
[]
[35]
[100, 35]
[1024, 100, 35]
[2048, 1024, 100, 35]

Using a for-each loop to print values...
2048
1024
100
35

Deleting 100
[2048, 1024, 35]

Deleting 2048
[1024, 35]

Deleting 35
[1024]
Let us talk a little bit about the toString() method.
    @Override
    public String toString() {
        StringBuilder o = new StringBuilder("[");
        Iterator<Integer> iter = iterator();

        // first data value is alone.
        if (iter.hasNext())
            o.append(iter.next());
        // remaining data values have ", value"
        while (iter.hasNext())
            o.append(", ").append(iter.next());

        return o + "]";
    }
The toString() code.
As you can see, we are building a complex String.
- Start with an open square bracket.
- Get an
Iteratorobject. - Get the first object and add it to the
StringBuilder. - Loop through all the remaining values to place the commas appropriately.
- Add the closing square bracket and returns the completed
String.
This tool is one of the most valuable in the tool chest when you are debugging or want to make the data suitable for human consumption.
main() is the only method altering the list, we are effectively safe. If, however, we wanted several methods to run simultaneously and have access to our list, then the Iterator needs to be synchronized to avoid the data changing beneath us while we view it.Implementing remove()
Now we consider a change to the code in Example 4b to use the default method remove().
The question often comes about, “If I do not need remove(), why is it there?” Good question!
Followed by, “If I wanted to implement remove(), how would I do it?” That is an equally good question!
The remove() method provides a handy mechanism to allow the user of the iterator to say, “Hey! That value – right there – the one you just gave me – remove it!” So, if you just called next() and discovered that is the value you wanted removed, you simply call remove() immediately after the call to next() and POOF! it is gone!
In other words, you can use an iterator for a for-each or while loop to find a value and remove it.
But what is involved in doing that? Example 4 provides a complete view of how to do this.
import java.util.Iterator;

public class IterableList2 implements Iterable<Integer> {
    private Node head;

    // This is the requirement of implementing Iterable. Provide
    // an iterator() method that returns an Iterator object.
    public Iterator<Integer> iterator() {
        return new LLIterator();
    }

    // This is what the iterator() returns to the caller.
    // This is the iterator object that processes the list.
    private class LLIterator implements Iterator {
    /* We are using three pointers to be able to delete the node
       of the currently returned value.
    */

        // next is the next node to be requested.
        private Node next = head,
        // the current node (and value) sent by next().
        current = null,
        // the previous node.
        back = null;

        private boolean nextCalled = false;

        // next performs the task of current from the previous version
        public boolean hasNext() {
            return next != null;
        }

        public Integer next() {
            int item = next.data;
            back = current;
            current = next;
            next = next.next;
            nextCalled = true; // safe to do remove()!
            return item;
        }

        /*


                       back       cur        next
                        |          |          |
                        V          V          V
                       +-----+    +-----+    +-----+    +-----+
        head --------> |   | |-XX | X | |--> |   | |--> |   |\|
                       +-----+    +-----+    +-----+    +-----+
                            |                   ^
                            |                   |
                             -------------------

        Head points to current chain.
        next, cur, back walk the chain until we find node
          to be deleted.
        The remove() method fixes head or back.next to point to same
          node as cur.next.

        */
        public void remove() {
            if (nextCalled) {
                if (back == null)
                    head = current.next;
                else
                    back.next = next;
                nextCalled = false; // reset!
            } else {
                throw new IllegalStateException();
            }
        }
    }

    private class Node {
        private int data;
        private Node next;

        private Node(int item) {
            data = item;
            next = null;
        }
    }

    public IterableList2() {
        head = null;
    }

    public void insert(int item) {
        Node n = new Node(item);
        n.next = head;
        head = n;
    }

    public void delete(int item) {
        Iterator iter = iterator();

        while (iter.hasNext())
            if (item == iter.next()) {
                iter.remove();
                break;
            }
    }

    @Override
    public String toString() {
        StringBuilder o = new StringBuilder("[");
        Iterator<Integer> iter = iterator();

        // first data value is alone.
        if (iter.hasNext())
            o.append(iter.next());
        // remaining data values have ", value"
        while (iter.hasNext())
            o.append(", ").append(iter.next());

        return o + "]";
    }

    public static void main(String[] args) {
        IterableList2 il = new IterableList2();

        System.out.println("Adding values...\n" + il);
        il.insert(35);
        System.out.println(il);
        il.insert(100);
        System.out.println(il);
        il.insert(1024);
        System.out.println(il);
        il.insert(2048);
        System.out.println(il);

        System.out.println("\nUsing a for-each loop to print values...");
        for (int i : il)
            System.out.println(i);

        // Remove a middle.
        System.out.println("\nDeleting 100");
        il.delete(100);
        System.out.println(il);
        // Remove a head.
        System.out.println("\nDeleting 2048");
        il.delete(2048);
        System.out.println(il);
        // Remove the end.
        System.out.println("\nDeleting 35");
        il.delete(35);
        System.out.println(il);
    }
}
Example 4: The IterableList2 class.
The key takeaway here is that delete() has gotten much smaller. The delete() method now uses an Iterator to walk the chain looking for the value to be removed. Once found, it invokes remove() followed by break to leave the loop.
So, how does remove() make this happen?
In remove(), we need to keep track of three pieces of consecutive information in the list. This is different from the original delete() method, which only needed two.
The original delete() method only required two consecutive pieces because the back reference was used to point around cur. The reference in cur is the object to be deleted. See below:
                   back       cur
                    |          |
                    V          V
                    -----      -----      -----      -----
    head --------> |   | |-XX | X | |--> |   | |--> |   |\|
                    -----      -----      -----      -----
                        |                   ^
                        |                   |
                         -------------------
With remove(), we need to remember that it is part of the iterator, and just because we are removing something, it does not mean we are invalidating the iterator.
                   back       cur        next
                    |          |          |
                    V          V          V
                    -----      -----      -----      -----
    head --------> |   | |-XX | X | |--> |   | |--> |   |\|
                    -----      -----      -----      -----
                        |                   ^
                        |                   |
                         -------------------
By using an additional reference next (not to be confused with the Node member), we can keep track of which node is next in line to be offered when next() is invoked and to provide an answer for hasNext().
By calling next(), the reference group of back, cur and next continue to advance. When remove() is called, the exact same re-linking action is taken, and everything remains in line for future calls.
An Alternative Node Approach
The node we have been using is as follows:
  private class Node {
      private int data;
      private Node next;

      private Node(int item) {
          data = item;
          next = null;
      }
  }
Some may ask, “Why is this node not more Java-like? Where are the getters and setters?” Ok, fair question.
In other words, they are asking about something more like the following:
  private class Node {
      private int data;
      private Node next;

      private Node(int item) {
          data = item;
          next = null;
      }

      private Node(int item, Node next) {
          data = item;
          this.next = next;
      }

      private void setData(int item) {
          data = item;
      }

      private void setNext(Node next) {
          this.next = next;
      }

      private int getData() {
          return data;
      }

      private Node getNext() {
          return next;
      }
  }
Now, remember that Node is an inner class to IterableList. With the situation of nested inner classes, the members of the inner class (data and next) are accessible from the outer (or enclosing) class. This is true even if the members are private.
The reverse is also true: The members of the outer class (like head) are accessible from the inner (or enclosing) class. Again, this is true even if the members are private.
Consider the insert() method from earlier:
  public void insert(int item) {
      Node n = new Node(item);
      n.next = head;
      head = n;
  }
See how we directly access the .next member? We could rewrite it as:
  public void insert(int item) {
      Node n = new Node(item);
      n.setNext(head);
      head = n;
  }
But, this makes an unnecessary and expensive method call. However, the newly overloaded constructor could make this better by expressing it as:
  public void insert(int item) {
      Node n = new Node(item, head);
      head = n;
  }
Depending on your perspective, it may seem less clear that a new node is replacing the current head of the chain.