(Updated December 18, 2024)
Overview
Hex dumps have been around for a very long time. Looking at binary is mind-numbing, and looking at decimal numbers is less than ideal. Using hexadecimal to show values is much easier on the eyes. With some experience, you can see the binary tucked inside, as each hex digit represents four binary digits.
The question is often raised: do hex dumps matter these days? Excellent question! One need look no further than Wireshark.

In the image, you can see the packet trace in the top half. In the bottom half, the left side shows the protocol breakdown, while the right side shows the hex dump of a selected packet that Wireshark captured.
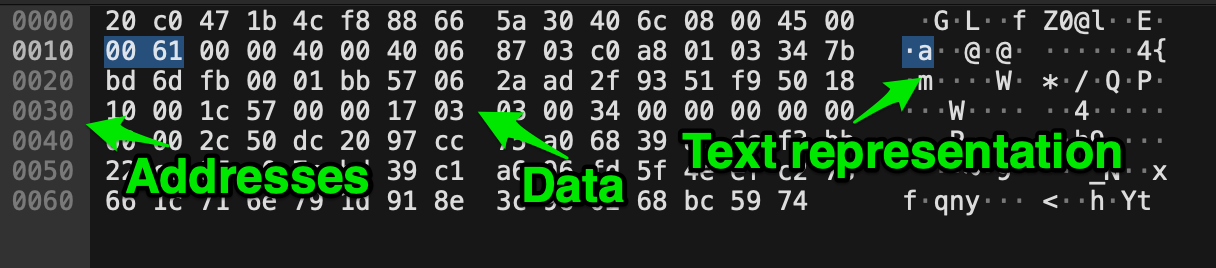
So, yes, while they may seem archaic, they are still quite handy today. The image below describes the three components of a typical hex dump: the addresses, data, and text representation of the data.
Often, seeing the hex values is not enough. We may not be readily aware that they may be specifically chosen, represent printable text, and can be helpful in debugging.
Sign Extension
Depending on the language used to create a hex dump, you may have to be prepared for some events affecting your data. Our code will contain the necessary details for looking at memory as a contiguous block of bytes. The code uses several features to maintain the continuity of the data representation. Since Java has no unsigned types, like C, when we move between byte and int types, there is a problem with sign extension. Ordinarily, we embrace sign extension. That’s what allows us to move -17 from byte to short to int without any work on the part of the programmer. As you can see below, we have the -17 representations, achieved by taking the sign bit and repeating it on the left.
                              1110 1111    8-bit

                    1111 1111 1110 1111   16-bit

1111 1111 1111 1111 1111 1111 1110 1111   32-bit
This is also true when working with positive numbers. Below are the +17 representations.
                              0001 0001    8-bit

                    0000 0000 0001 0001   16-bit

0000 0000 0000 0000 0000 0000 0001 0001   32-bit
The Hex Dump Code
First, we look at code demonstrating the sign extension problem.
public class SignExt {

    public static void main(String[] args) {
        byte b = (byte)0xff; // 255 unsigned, but -1 signed.

        // se represents the sign-extended value.
        int se = b;
        // nse prohibits sign extension by masking the higher-order bits.
        int nse = b & 0xff;

        // first, we show the decimal representations
        System.out.println("b is " + b + "\nse is " + se + "\nnse is " + nse);
        // then we show how the hex values enlighten the issue.
        System.out.printf("b is %02X%nse is %02X%nnse is %02X", b, se, nse);
    }
}
The output of the code is shown below.
b is -1
se is -1
nse is 255
b is FF
se is FFFFFFFF
nse is FF
When the first three lines are shown, it’s difficult to see the issue because we see -1 and 255 and wonder what’s happened. However, the following three lines show what has happened; the number of bytes has grown, and the representation has exceeded 8 bits. Remember that byte is a signed value by default. What we look to do is preserve the bit pattern, which has nothing to do with the sign.
The mask used for nse shows how we correct the issue.
    1111 1111 1111 1111 1111 1111 1111 1111     (-1 in two's complement form)
  & 0000 0000 0000 0000 0000 0000 1111 1111     (bitwise and with 0xff)
-------------------------------------------
    0000 0000 0000 0000 0000 0000 1111 1111     (preserved 8-bit representation)
The same works for any number, like our -17
    1111 1111 1111 1111 1111 1111 1110 1111     (-17 in two's complement form)
  & 0000 0000 0000 0000 0000 0000 1111 1111     (bitwise and with 0xff)
-------------------------------------------
    0000 0000 0000 0000 0000 0000 1110 1111     (preserved 8-bit representation)
This makes it sound like 0xff is some magical constant. It’s not. The value represents the lowest 8 bits as ones and all others as zeros. Nothing more.
Finally, we take this knowledge and move forward with our hex dump.
The hex dump code takes an array of bytes and displays them in an orderly grouping of hexadecimal values. This is done by reading the entire file into a byte array. Since the file represents an executable for a Commodore 64 computer, we know that the first two bytes are the little-endian representation of the loading address in memory.
00 50. Thus, the low-order, or little end of the number is listed first. In big-endian, the big end is listed first, so it would be 50 00.Once we know that, it’s simple to capture the starting address; the remaining bytes are the program itself. The comments in the code below detail how the formatted output is achieved.
import java.io.FileInputStream;
import java.io.IOException;

public class HexDump {

    public static void hexDump(byte[] bytes) {
        // we and with 0xff to mask off the bits when sign-extended.
        int start = (bytes[1] & 0xff) * 256 + (bytes[0] & 0xff);
        System.out.println(start);
        int pc = start;
        StringBuilder chars = new StringBuilder();

        for (int x = 2; x < bytes.length; x++) {
            // make it pretty
            if ( (pc - start) % 8 == 0 ) {
                // chars are built during each iteration, but
                // printed when we reach the end of the line.
                System.out.printf(" %s", chars);
                System.out.printf("%n%04X:", pc);
                chars.setLength(0);
            }
            // build the chars - only printable chars
            char c = (char)(bytes[x] & 0xff);
            if ( c >= 32 && c <= 127 )
                chars.append(c);
            else
                chars.append('.');
            // the next line uses a ternary operator to achieve the above.
            //chars.append(( c >= 32 && c <= 127 ) ? c : '.')
            System.out.printf(" %02X", bytes[x]);
            pc++;
        }

        // fix final row
        int last = (pc - start) % 8;
        for (int x = 0; x < 8-last; x++)
            System.out.print("   ");
        System.out.printf(" %s", chars);
    }

    public static void main(String[] args) throws IOException {
        FileInputStream in = new FileInputStream("/uploads/mult.prg");

        byte[] file = in.readAllBytes();

        in.close();
        hexDump(file);
    }
}
The output of hexDump() is shown below.
20480

5000: AE 5A 50 A9 00 20 CD BD .ZP.. ..
5008: A9 0D 20 D2 FF AE 5B 50 .. ...[P
5010: A9 00 20 CD BD A9 0D 20 .. ....
5018: D2 FF A9 00 8D 57 50 8D .....WP.
5020: 58 50 8D 59 50 A2 08 4E XP.YP..N
5028: 5A 50 90 13 AD 58 50 18 ZP...XP.
5030: 6D 5B 50 8D 58 50 AD 59 m[P.XP.Y
5038: 50 6D 57 50 8D 59 50 0E PmWP.YP.
5040: 5B 50 2E 57 50 CA D0 DF [P.WP...
5048: AE 58 50 AD 59 50 20 CD .XP.YP .
5050: BD A9 0D 20 D2 FF 60 00 ... ..`.
5058: 00 00 0C 0A             ....
C Version
Here is a variation of the hex dump code written in C (C23 compatible).
#include <stdio.h>
#include <stdlib.h>

void hexDump(const unsigned char bytes[], long length) {
    // we and with 0xff to mask off the bits when sign-extended.
    int start = bytes[1] * 256 + bytes[0];
    printf("%d\n", start);
    int pc = start, c = 0, x;
    unsigned char chars[10] = {0};

    for (x = 2; x < length; x++) {
        // make it pretty
        if ( (pc - start) % 8 == 0 ) {
            // chars are built during each iteration, but
            // printed when we reach the end of the line.
            printf(" %s", chars);
            printf("\n%04X:", pc);
            c = 0;
        }
        unsigned char ch = bytes[x];
        // build the chars - only printable chars
        chars[c++] = ( ch >= 32 && ch <= 127 ) ? ch : '.';

        printf(" %02X", bytes[x]);
        pc++;
    }

    // fix final row
    int last = (pc - start) % 8;
    chars[c] = '\0';
    for (x = 0; x < 8-last; x++)
        printf("   ");
    printf(" %s\n", chars);
}

int main(void)  {
    FILE *fp;
    const char *fname = "/uploads/mult.prg";
    unsigned char *file;

    // open file
    if ( (fp = fopen(fname, "r")) == NULL ) {
        fprintf(stderr, "Cannot open %s.\n", fname);
        return(1);
    }

    // find the file size
    fseek(fp, 0, SEEK_END);
    long len = ftell(fp);

    // allocate memory for the file - no error checking
    if ( (file = malloc(len + 1)) == NULL ) {
        fprintf(stderr, "Cannot allocate memory for file.\n");
        return(2);
    }

    // Read the file into the char array
    rewind(fp);
    fread(file, len, 1, fp);
    fclose(fp);

    hexDump(file, len);
    free(file);
}
This differs significantly from the Java version. Much of C involves primitive actions. For example, in Java, we could read the entire file with a call to readAllBytes(), and it even created the array. In C, we have to use fseek() to find the end, then ftell() to know where we are, and finally rewind() to get back to the beginning.
But it doesn't stop there since we also have to allocate memory with malloc(), fread() the data and remember to free() the memory after we're done calling hexDump().
One bright spot is using unsigned char. There's no need to mask things since the unsigned modifier stops the sign extension from happening.
Python Version
We present a Python version for anyone who wishes yet another version. This is free of warnings up to Python 3.12.x. There may be more clever ways to attack this problem, but the goal of this version was to try to align with the other versions so newcomers can compare them.
def hexdump(byte_data):
    start = byte_data[1] * 256 + byte_data[0]
    pc = start
    print(start)
    chars = ""
    for x in range(2, len(byte_data)):
        # make it pretty
        if (pc - start) % 8 == 0:
            # chars are built during each iteration, but
            # printed when we reach the end of the line
            print(" %s" % chars)
            print("%04X" % pc, end='')
            chars = ""

        # build the chars = only printable chars
        c = byte_data[x]
        chars += chr(c) if 32 <= c <= 127 else '.'
        print(" %02X" % byte_data[x], end='')
        pc += 1  # no ++ op in python!
    # fix final row
    for i in range(0, 8 - (pc - start) % 8):
        print("   ", end='')
    print(" %s" % chars)


if __name__ == "__main__":
    # main function
    file_name = "/uploads/mult.prg"
    try:
        # with closes file when completed.
        with open(file_name, 'rb') as file:
            file_data = file.read()
    except FileNotFoundError:
        print(f"File not found: {file_name}.")
        exit(1)

    hexdump(file_data)
Note that this version only uses a ternary operator to build the string. What is incredible is using printf-style formatting in all versions.